What To Do When . . .Your Computer Is Running Very SlowlySpeed Up A Sloth-Like PC With These TipsWhat happened to your heavy-duty speed-demon system? All those megabytes of memory, big bad buses, and CPU clock cycles haven't kept your PC from drifting into the slow lane. This isn't just the gradual degradation most PCs undergo over time. But there haven't been any major blowups, either. So what gives?
A number of factors, having little to do with the age or capabilities or your system, can create excruciating system slowness. The Windows OS (operating system) is notoriously inefficient, which can affect performance. The file system also impacts Windows and hardware performance. How you work with applications can improve system speed, as can some basic hardware updates. Try the easy steps below to get your system back into the fast lane.
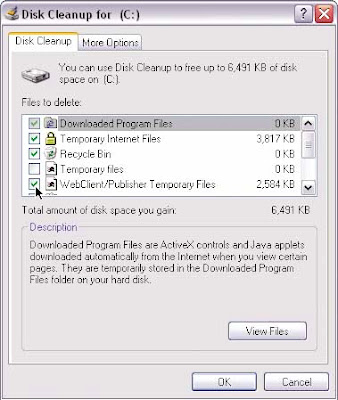
Windows' Disk Cleanup utility will help you free up hard drive space, giving Windows and other applications more room to work.
Operating System.The operating system is a critical piece of software that has a great influence on the overall performance of your PC. There are many things you can do within the OS that will help speed up a slow computer.Limit startup programs. The wrong startup programs can slow down your PC at boot time and beyond. Unnecessary startup applications not only bog down the boot process, but they also run (often hidden) in the background and consume valuable system resources. Too many background applications will eventually leave nothing left for active programs.
The easiest place to find and remove startup applications is in Windows' Startup folder. From the Start menu, select Programs (All Programs in Windows XP) and find the Startup folder. Delete anything that doesn't absolutely need to run automatically all the time. Firewall and antivirus applications are two of the very few types of programs should always be running on your PC. Not all vendors are up front enough to place their applications in the Startup folder, however. Use Windows' System Configuration Utility to remove hidden startup applications. From the Run prompt (in the Start menu) type msconfig and click OK. Select the Startup tab to check out what other apps are launching at boot up. Uncheck anything nonessential. Many processes and programs have cryptic or obscure names. When in doubt, search the Web to find out what a particular process is supposed to do.
Clean out fonts. Fonts are wonderful things. The different types let you give voice to a wonderful variety of expression. But unused or useless fonts are a drag on system performance. Windows loads all your fonts at bootup, just to keep them handy in case an application needs them. But the more fonts you have, the more resources Windows consumes in keeping track of them. You probably have dozens of fonts you won't ever need, and didn't know you had. Periodically go into Windows' Fonts folder (C:\Windows\Fonts) and remove any unused Fonts. Select each font (hold down SHIFT or CTRL while clicking to select contiguous or noncontiguous groups, respectively) and choose Delete from the File menu. Double-click a font to view a sample.
End active desktop. Windows' Active Desktop feature, introduced with Internet Explorer in Windows 95, brings live Web content to your desktop. Even if you enjoy this constant stream of information, it can require exorbitant amounts of video and system memory. Deactivate Active Desktop in Windows 9x/Me by right-clicking a blank area of the Desktop, clicking Properties, and selecting the Web tab. Uncheck the View My Active Desktop As A Web Page box. In WinXP, right-click the Desktop, choose Properties, and select the Desktop tab. Click the Customize Desktop button and, under the Web tab, uncheck each listed Web page.
Keep it simple. WinXP's default set of animations and transitions is pleasing to the eye. But it doesn't do your PC any favors, especially if your hardware is a couple years old. All that sliding, fading, and shadowing takes a toll on memory and processing power. But WinXP animations aren't an all-or-nothing proposition. You can customize which effects to use or let Windows handle the decisions. Access your System Properties from the Control Panel (or by right-clicking My Computer and selecting Properties).
Windows' Disk Cleanup utility will help you free up hard drive space, giving Windows and other applications more room to work.
Navigate to the Advanced tab and select the Settings button in the Performance category. Prioritize performance, appearance, or let Windows choose a middle route. Alternately, choose the Custom option and enable or disable specific visual effects by checking or unchecking their respective entries.
Play server. Win98 and WinMe handle caching and multitasking functions based on whether they think you're running a desktop, mobile, or server-type machine. The nice thing is that you get to decide. Setting your machine up as a "network server" in Win98/Me will take advantage of performance features standard in later OSes. Right-click My Computer on the Desktop and choose Properties from the context menu that appears. Select the Performance tab and click File System. Change the Typical Role Of This Computer field to Network Server.
Clean out the Registry. Windows' Registry often contains duplicate or obsolete entries. The Registry is a database storing all the configuration information for the OS and your system—cleaning it out can help improve Windows' performance dramatically. Don't try to browse and delete Registry entries manually, though. You can easily render your system inoperable with one wrong move, so find a respected Registry utility (we review several in our "System Performance Utilities" sidebar). No matter how much you trust a Registry utility, though, always back up the Registry before attempting to clean it out. Launch the Registry Editor from the Run option under the Start menu. Type regedit in the command line
and click OK. From the File menu, click Export and save the backup file (with a .REG extension) in a safe place. To restore the Registry, simply open the Registry Editor again, choose Import (also under the File menu), and find your backup file.
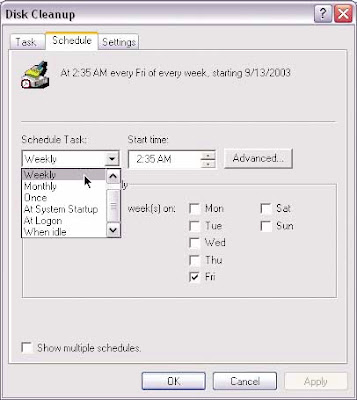
Use Windows' Task Scheduler to automate routine maintenance activities.
Reinstall. Over time, despite your very best efforts, Windows can become so top-heavy and cluttered with orphaned files, abandoned applications, and unnecessary processes that it's best to just start over from scratch. Power users, especially those with lots of programs and a large amount of file system activity, are especially prone to bogging down the OS. Though reinstalling the OS is an extreme step, and should be a last resort, you will probably see a significant improvement in performance with a clean Windows installation. Be prepared to back up all your data, reinstall all programs, and devote time to setting up again. See "What To Do When . . . You Need To Reinstall Your OS" on page 43 in this issue for in-depth step-by-step instructions.
File System.Organize and maintain your files to keep your PC running smoothly. Here are some tips for the specific areas.Make room. A full hard drive will bog down your system on all fronts. For one, as the drive fills up, Windows has to search more and more data to fulfill each request. More importantly, though, a full disk hinders the OS' ability to move files around temporarily and to manage virtual memory. First, empty the Recycle bin. You can easily lose hundreds of megabytes to files just sitting around waiting to be fully deleted. Then, run Microsoft's Disk Cleanup utility. From the Start menu, you will need to go to Programs, Accessories, and System Tools. Open Disk Cleanup, select the drive, and click OK. The utility will analyze the system and offer suggestions. Check each box and click OK. Next, uninstall unused applications. From Windows' Control Panel, select Add/ Remove Programs. Remove any programs you don't use, especially applications preinstalled by the manufacturer. Finally, archive infrequently used data to removable storage.
Remove temporary files. Disk Cleanup doesn't get rid of everything. Free up even more space by manually searching for and deleting temporary files. Most applications use temporary files to store session-specific information, back up active files, and (in theory) delete them when you close the program. But sometimes, for a variety of reasons, temporary files aren't deleted. So they sit, taking up valuable disk space, and not doing anything remotely useful. Open Windows' Search tool (called Find in Win98) from the Start menu. Find all files beginning with a tilde (~) (search for "~*.*") and all files with a .TMP file extension (search for "*.tmp"). Remove any that aren't immediately associated with an open file or application.
Defragment. A full hard drive isn't your only potential problem. Even with plenty of free space on a drive, the file system can become so fragmented that Windows can't efficiently access and store data. The OS stores information on a hard drive in sectors. When there aren't enough contiguous sectors available, Windows stores parts of files in different places on the disk and then keeps track of them all in a file allocation table. Removing files and applications further scatters sectors on the disk. Thus, over time, fragmentation occurs as more and more files are split up and stored in more and more places. And, because the system has to search more places to find files and work harder to put them together, fragmentation is a major drag on system performance. Run Windows Disk Defragmenter tool to rearrange files in the most optimal way. From the Start menu, open Programs, Accessories, and then System Tools. Open the Disk Defragmenter utility. In WinXP, let the utility analyze each drive to assess its level of fragmentation and determine whether it's worth defragging.
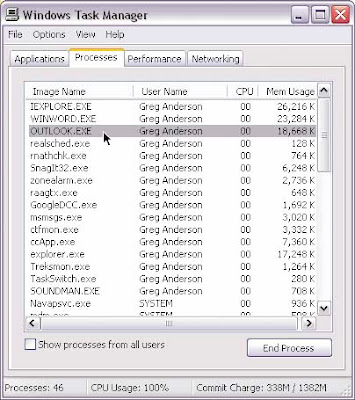
When your system slows down, check Task Manager for closed-down applications that haven't relinquished their hold on system resources.
Scan for viruses. Viruses, worms, and Trojan Horses can all create serious system slowdowns. If you're already running anti-virus software, make sure the virus definitions are up-to-date (these are normally downloaded from the program's manufacturer, on a subscription basis) and perform a complete system scan. If you don't have an antivirus package, buy one. Install the software, update it, and then run a complete scan. In either case, schedule regular (at least weekly) scans and definition updates.
Perform regular maintenance. Don't make Disk Cleanup, temporary file removal, Disk Defragmenter, and antivirus scanning one-time activities. Without proper maintenance, system speed will continue to degrade needlessly. Schedule these activities using built-in tools (as with most antivirus programs) or using Windows' Task Scheduler. From the Start menu, navigate to Programs, Accessories, and System Tools. Open Scheduled Tasks. Double-click Add Scheduled Task to launch the Scheduled Task Wizard. Choose an application you want to run (Disk Cleaner, for example), set the schedule, and enter the login information of a user with permissions to run the program.
Applications.Here are some software usage tips that you can use to boost your system's performance.Uninstall correctly. When removing an application, use Windows' Add/Remove Programs utility (from the Control Panel) or the program's own uninstall utility. If you just remove the application's folder from Program Files or manually delete files, you'll miss Registry entries and hidden or cryptically named files. In time, debris from all kinds of long-forgotten programs will clutter up the system and bog it down. Performing official uninstalls will help prevent the problem, but how do you fix your current predicament? If possible, reinstall improperly removed programs, and then uninstall them the right way. Otherwise, plan on using a Registry cleaning utility and Disk Cleanup to clear out as much flotsam and jetsam as you can find.
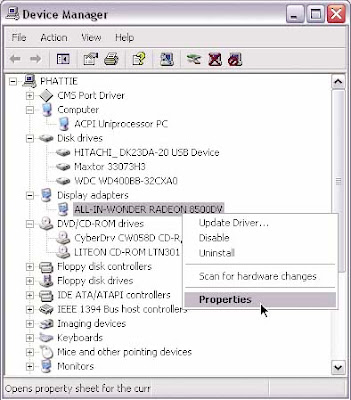
Bad or outdated device drivers can slow your system down. Check and update drivers with Device Manager.
Check for cling-ons. Not all applications shut down gracefully and relinquish their system resources when you close them. Sometimes programs or their associated services will hang on after closing, or Windows will continue to assign resources to an application even after exiting. Check Task Manager (by pressing CTRL-ALT-DEL) for programs you aren't actually running. In WinXP, click the Processes tab for more detailed listings. Netscape, Adobe Acrobat Reader, Microsoft Outlook, and RealPlayer are notorious for remaining "resident" in memory and continuing to monopolize scarce resources. Select each unneeded application or process and click End Task or End Process, respectively, to force it to quit.
Do more with less. Multitasking is one of the great computing innovations of the last decade. But the ability to work in a number of programs at once is a dual-edged sword. The possibilities of multitasking often lead users to approach or exceed their systems' capabilities. If you're doing several things at once, and the system bogs down, accomplish more by closing extra applications and just doing one thing at a time.
Roll back or upgrade. It's almost a law of software: As hardware speed and capacity improves, software gets bigger, buggier, and more bloated. Chances are the applications and software versions you have on your system today aren't the same as when your machine was running so much faster. Especially if you upgraded Windows, you're asking much more of your hardware. And as you continue to add and upgrade software, the programs will get bigger and require more system resources.
It's a depressing inevitability: over the long term, your computer will get slower and slower, until it's obsolete and needs replacing. In the short term, though, you have two options: downgrade software or upgrade hardware. The former might not be feasible, if you don't own previous versions or need certain new features. But if you aren't getting anything extra out of a new software version, uninstalling the new version and reinstalling the old may free up resources. Otherwise, pony up for a hardware upgrade. Adding system memory (RAM) will provide the most bang for your buck. Also, consider a newer (bigger and faster) hard drive or a new video card (with its own processor and video memory).
Hardware.So far, our tips have focused on the software inside your PC, but there are some quick and inexpensive ways to speed up your hardware, too.Cool down. An overheating processor can drastically affect speed. In fact, if the CPU (central processing unit) gets too hot, you'll have a clock speed of exactly zero. Even a slightly overheated system, though, will perform sporadically and often sluggishly. First, back up all your data. Then shut down and disconnect the power cable. Open the case (you'll probably need a screwdriver), reconnect the power, and boot up. Make sure all fans are running and are unobstructed; check for case fans in addition to a processor fan and heatsink. Shut down and unplug the system again. Make sure there is plenty of room for airflow within the case. Use cable ties to group wires and move them out of the way. Feel the processor fan or heat sink. It should be warm, but if you can't even stand to hold your finger to it for a second or two, you may have a heat problem. Purchase a newer or larger CPU fan or heatsink and invest $5 in a case fan, if you have a spot for one.
Update device drivers. Updated drivers can often breathe new life into old hardware. Better yet, they can help prevent hardware from bogging down the rest of the system. Check the manufacturers' Web sites for each of your hardware and peripheral devices. Download and install any updated drivers, rebooting as necessary. Either download and install drivers directly, or use Windows' Device Manager. Right-click My Computer and select Properties from the context menu. Under the Hardware tab, click the Device Manager button. Right-click each device (expand the categories by clicking the plus sign [+] on the left) and select Properties. Under the Driver tab, view details such as date and version number or click Update Driver to browse for (or let Windows search for) new driver files. And yes, WinXP lets you rollback a driver to a previous version or uninstall the driver entirely.
Add memory. What used to be a generous amount of system memory (64 or 128 MB) is now, under many circumstances, woefully inadequate. WinXP requires 128MB, but we recommend 256MB or even 512MB. If you upgraded the OS or added other new software, you may simply not have enough system memory. And if you expanded your hardware collection or just do more with your PC, adding more memory can make all the difference.
Check your system documentation for the type and amounts of memory the motherboard accepts. Most recent motherboards will hold two or three memory chips with a total capacity of 512MB or 1GB. Be careful to buy the right kind of chip, though. SDRAM, DDR, and EDO are all competing standards and aren't cross-compatible. Also, within each category, buy the fastest memory your system will support. More memory is the single best upgrade for your system—it provides the greatest performance improvement for the least cost (under $100 for 512MB). It will do more than any other single upgrade to speed up your system and improve overall performance. So get the fastest and the most memory your system supports and max out the motherboard.
When a good system goes bad, it's tempting to (figuratively) throw it out the window and go shopping. But most of the time, severe system slowdowns result from easily fixable software and hardware problems. With a little patience and a little troubleshooting, you can follow these steps to speed up your existing system and get back into the fast lane.


